welcome to
The tomkat studio blog
Search
How to Make Edible Image Cookies {Halloween Cookies}
Share To:
Our talented contributor, Marian from Sweetopia is sharing step by step instructions with us today on how to make edible image cookies! Enjoy!
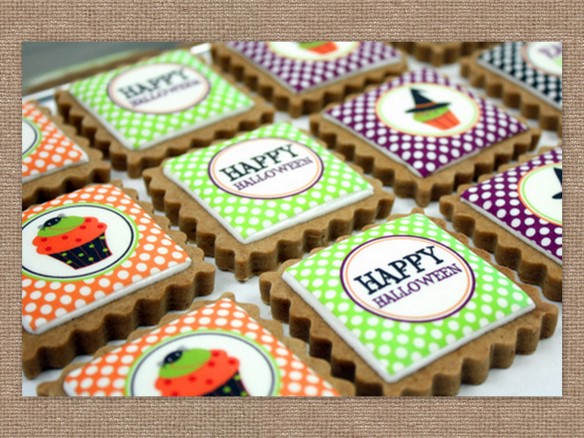
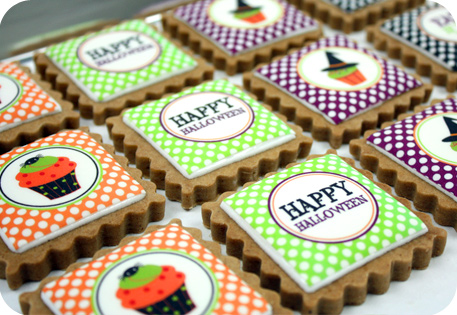
Celebrating Halloween in sweet treat style is easy with The TomKat Studio’s Halloween Cupcake Party Collection! Besides using the images as fun cupcake toppers, they also turn into adorable edible-image cookie party favours.

- If you’d like to make these, you’ll need a cookie recipe of your choice, such as gingerbread or sugar cookies. I used gingerbread.
You’ll also need:
- Royal Icing Recipe and food gel colouring (white, green & orange)
- Piping bags
- Couplers
- Piping Tips (#2 and #16)
- Fluted, square cookie cutters
- The TomKat Studio Halloween Cupcake Printables
- Edible ink printer, food coloring cartridges and frosting sheets
*(or ask your local bakery to print them for you)
Making Halloween Image Cookies:
Once you’ve made your cookies & made and colored your royal icing, you’re ready to decorate:

Step 1: Outline cookie with white royal icing using a #2 piping tip.

Step 2: Fill in or flood your cookie using the same piping tip.

You can outline and fill in right away, or do all your outlines first, then go back and flood the cookie.

Step 3: Let your icing dry (12-24 hours).

Step 4: Cut the edible ink image out right before you’re ready to use it.

Step 5: With a paintbrush only used for this purpose, apply a thin layer of clear corn syrup to the surface of the dry icing.

Step 6: Peel the backing from the frosting sheet and place the Halloween image onto the cookie.

Step 7: Adhere image to cookie by gently pressing from the centre and outwards.
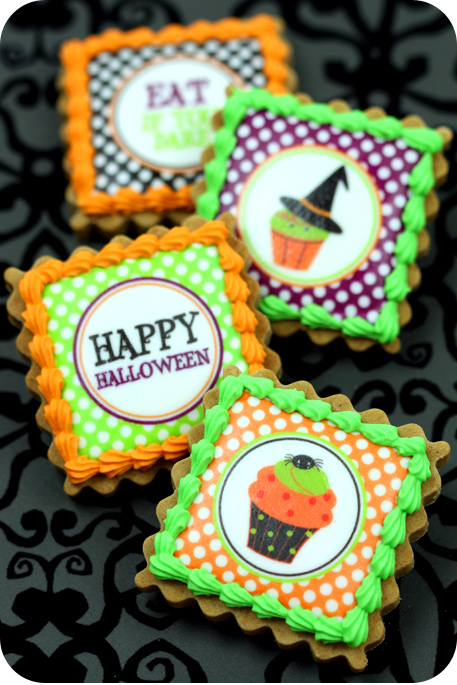
Step 8: Thicken your white royal icing by adding icing sugar. You’re looking for the icing to form a peak when you put a spoon in it and pull upwards.

Step 9: Colour some of the icing green and some orange.

Step 10: Use a #16 star tip to pipe a shell border.

That’s it! Serve as is or let them dry and package in a cellophane bag tied with ribbon.
Happy Halloween!
xo, Marian
Thank you for sharing this tutorial with us, Marian!
Marian just launched her new website, have you seen it yet?
Visit Sweetopia here!
October 26, 2011
Post Date:
Leave a Reply
SUBSCRIBE
Don't miss a thing! Subscribe to our email list to keep up with our latest projects, listings, blog posts and giveaways!


Completely perfect. Love these! Just posted a link to here and Marian over at Edible Crafts. 🙂
So where can you get these edible images for the Halloween cookies?
Hi Brenda!
You can purchase our designs (any party circles) and print them on edible paper!
Kim
Name of edible ink printer and place where you buy your sugar sheets.
I’ve just added a link in the post for you. Happy decorating!
i just recently started using Sugar Sheets & they are so fun… I have used the Wilton brand & Duffs which I got from our local craft store like Michaels… the sugar sheets already had designs on them but, now I am going to look into purchasing an Edible Ink Printer & Plain Sugar Sheets so i can incorporate my own designs…
Thank you so much for posting this method! They are amazing looking and would work for so many different parties, gifts, wedding, etc.
Very nice!! 🙂
thanks for the tutorial. if you don’t want to use royal icing under the image I use fondant cutout in the same shape as the image and then stick the edible image to that.
Have you guys tried the premium icing sheets from Icing Images? They are really cool and have an easy to peel backing. You should check them out. Their icing sheets amazed me when I first saw them at ICES this year. They had them setting out for hours and you could still peel them off the backing and they weren’t even cracked.
These look amazing! What a perfect way to coordinate all of the sweet touches of your event…and so much easier for those of us who are a little “royal icing” impaired when it comes to decorating treats!!
Hi Marian!
Can you tell me what brand of cookie cutter you used for these cookies? I currently use the Ateco fluted squares, but my edges are not as pronounced as this cutter. I was just curious where you got the cutter 🙂 Thanks
How long does it take for the corn syrup to dry so that I can package the cookies?