welcome to
The tomkat studio blog
Search
{Cupcake Monday} How To Frost Cupcakes with a Beautiful Swirl!
Share To:
Happy Cupcake Monday! Glory of Glorious Treats here with some simple tips and techniques to help you make beautiful cupcakes. Kim and I are both often asked about the pastry tips we most commonly use to frost cupcakes. If you have ever been curious about the pretty, ruffly swirls… I’m hear to show you how simple it really is! Piping frosting on cupcakes is actually quicker than spreading it on, and the results are much fancier!
Ready to make some beautiful cupcakes?
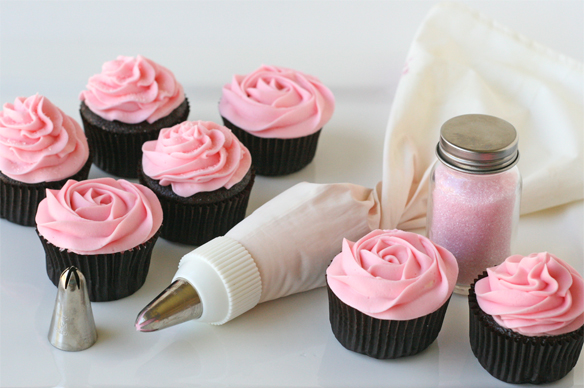
You’ll need…
A large pastry bag
A Wilton 2D or 1M tip (the 2D is a closed star, the 1M is an open star, the end results are similar, with the 2D being slightly more ruffly)
A batch of delicious, thick icing (like my American Buttercream)
Baked and cooled cupcakes
Directions:
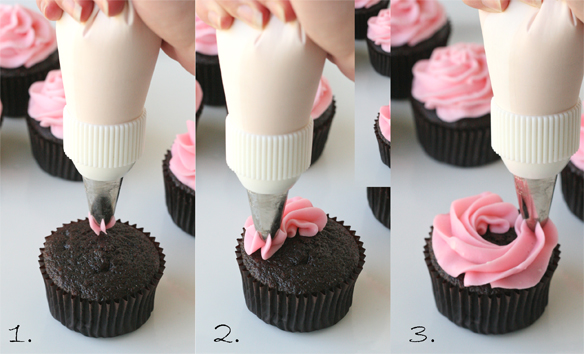
1. Hold the piping bag straight up, start frosting from the outside edge (about 12 o’clock position), and begin swirling around the outside edge.
2.-3. Continue squeezing with constant pressure as you work around the edge of the cupcake (I go counter-clockwise, but I don’t think you have to).
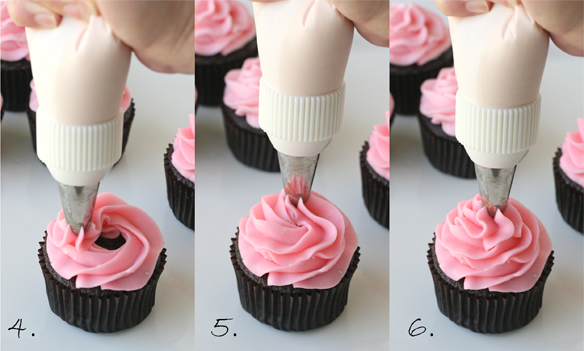
4.-5. Continue in a spiral motion, creating another layer of icing, working in toward the center.
6. Finish the spiral in the center, release pressure on the bag, and pull straight up.
Voila! A beautifully frosted cupcake. At this point, you could add sprinkles or a TomKat Studio topper, and you have a beautiful dessert perfect for most any occasion.
A few notes… the most common problem people seem to have with piping frosting on cupcakes is the frosting not being thick enough to hold it’s shape. Make sure your ingredients (butter, milk, etc) are nice and cool as you make your icing, and make sure not to add too much liquid. If you find the icing a bit soft, you can put it in the refrigerator to firm up a bit, or if necessary add a bit more powdered sugar.
Here are links to some delicious basic recipes, as well as some helpful tips on baking and decorating cupcakes…
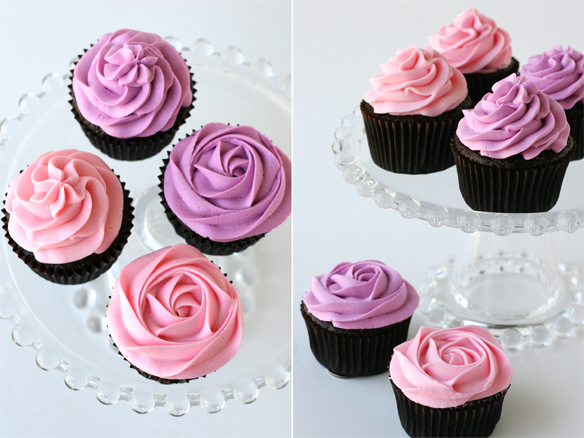
How to frost cupcakes (includes a vide0 tutorial), and includes the rose technique pictured above.
As with any craft or skill, making beautiful cupcakes requires a bit of practice and experimentation… but it shouldn’t be too hard to find people willing to eat your “practice”.
August 15, 2011
Post Date:
Leave a Reply
SUBSCRIBE
Don't miss a thing! Subscribe to our email list to keep up with our latest projects, listings, blog posts and giveaways!

Great tutorial! =)
🙂
Just what I need it , for this weekend.. Thank you so much!
Love this, thank you for sharing. I’m rare in the fact that I don’t like a mound of icing on top of my cupcakes. But my customers do, so thank you for sharing this simple method of building up the icing. I love the flat icing ones though, they look like roses!
The ones that look like roses are frosted using the same tips listed in the post, but start the swirl in the center of the cupcake, and do one flat spiral to the outside of the cupcake, I have a vidoe tutorial that includes the rose cupcakes (as mentioned in the post above), http://glorioustreats.blogspot.com/2011/08/cupcake-basics-how-to-frost-cupcakes.html
It’s so nice to be able to use the same tip, so then you can easily make some of both styles in a single batch of cupackes.
Hi Glory,
Just wondering if you could help me with an icing question 🙂 I’ve been using a Wilton 2D tip to ice my cupcakes following this method for a while, but recently it has started to do something weird to the icing. It seems to be splitting into separate streams and doing what I can only describe as ‘ribboning’, instead of sticking together as one stream. Any idea what might be happening?
If you start in the center of the cupcake and “swirl” out to the edge, you end up with the cupcakes that look like they have a large rose on the top (see her pics…you can tell which were done according to her tutorial and which look more like a rose). They are both beautiful techniques.
I love these.
Thanks! I was just at the store yesterday trying to figure out which tip to get to do this, now I know! 🙂
Thanks so much! It’s a bit confusing trying to figure out which tip does what ~ this is wonderful.
Just a note about clockwise vs counter-clockwise…when I started making my cupcakes, I was frosting
counter-clockwise and my frosting kept leaning to one side. I just told myself that I needed to practice more. It was really bothering me and it was not getting better. So one day I was envisioning frosting cupcakes while driving home from work (i’m not the only one, right?) and in my head it seemed more comfortable to go clockwise. I tried it, and right away there was a HUGE difference in how my piping looked.
This may be because I’m left handed, but I just wanted to throw that out there for anyone else that is having trouble with their piping.
Great tutorial!
I’m so glad Glory did this post! I’ve been meaning to share a tutorial on this technique forever. I’m a clockwise girl! 🙂
I loved looking at the cakes. I am just about to learn how to do that. I am going to make chocolate cakes and had thought pink frosting. Now I know I want pink frosting. I might try yellow too. Anyway thank you for inspiring me. I just bought all the tools for cake decorating. I will try your recipe.
This is super helpful, definitely going to pin it! Thank you 🙂
Thank.you.very.much
ya.my. spacebar. isn’t.working
cheeeeers
thats great!! dont know if I could do that but maybe i’ll try!!
wow, this is so fantastic ! Perfect for a wedding desk !
Great Tutorial!
So great I had to bake some cupcakes just so I could practice icing them immediately!!
Thank you!!
I just bookmarked this the other day so I could attempt to do it myself. They look so pretty. Great tips, look forward to trying this out.
Lovely! Great tutorial for the perfect cupcake! I like to add 2-3 tbsps. of Meringue Powder to my frosting to firm it up. Shape will even withstand moderately warm temps outdoors for the duration of your party!
Found you via Gypsy at Heart. I just love that you showed this in detail. I have the pastry bag and tips but my cupcakes didn’t look like yours. I think it’s that my frosting is too soft and that I wasn’t holding my bag vertically. Thanks so much!
Hi Glory, I am a mother of a bride to be and she is wanting a cupcake bar as part of her reception. Is it possible to mak a few weeks in advance because of the time factor. Is it possibale to bake cool frost & freeze? An advise would be very much appreciated.
yes it is possible but the frosting wont turn out that good
So beautiful! I need to get these bigger tips for my bags!! Can you help me out with something please? I have been having a problem when trying to put my stuff on Pinterest. I cannot get my posts from my blog to link with my pictures. When I try to copy my link to the whole post, it says it can’t find any images?!?!?! I know there must be a way to do it. I see you have done it with your pictures and other bloggers have done it , too. I just can’t seem to understand what to do. Is it how I’m uploading the pictures to the blog to begin with or how I’m doing adding them to Pinterest? Please help!! =) Thank You!
its better to get the smaller tips with the four holes
it looks bueatiful but not creative,not challenging,too simple, not that fun
Hi,how did you make the rose like design?
The pink is Glorious! What colour did you use to create it? And what icing recipe. I’m guessing, not a butter based one? Thanks Clair x
Great tutorial!
soy de Venezuela y no hablo ingles podrían ayudarme mandandome la receta de como hacen la cubieta de cupcakes, me encanta su página pero no comprendo y no soy muy diestra en esto de internet
thanks you cause i did not now how to do cupcakes designs
Can you do this with store bought icing?
Have ur recipe for the frosty Love it thank u
Can I please Have ur recipe for the frosty Love it thank u
hello
can i use these pictures in my web with your website address of curse?
This sitemap can be submitted to major search engines.
If you’re wondering how you can create a better website with the use of Joomla’s built in SEO tools,
this article is just what you’re looking for. In fact, a systematic graphical representation is done by professional designers who have creative bent of minds.
Thanks for your great tutorial, mine didn’t turn out quite as good as yours but I’m sure I’ll get better with practice!
Absolutely loved the tutorial and the photographs above. Just wondering if you have the same style photos with the rose design. (Yes I realize it’s just changing your starting/ending place but I’m a visual person)
I’ll definitely be back to try some of these recipes and techniques!
Hello,
Is the rose technique done with Wilton 1M or 2D? I just noticed in the pictures two of the cupcakes have the rose design. Do you have a tutorial on how to do this technique?
Thank you in advance and beautiful pictures!
Thank you for this tutorial. It is very much appreciated. I will be using this swirl on girly baby shower cupcakes this weekend. 🙂
Heaven Ris avec les gamins,