welcome to
The tomkat studio blog
Search
Tissue Paper Tassel Garland Tutorial :: HGTV
Share To:
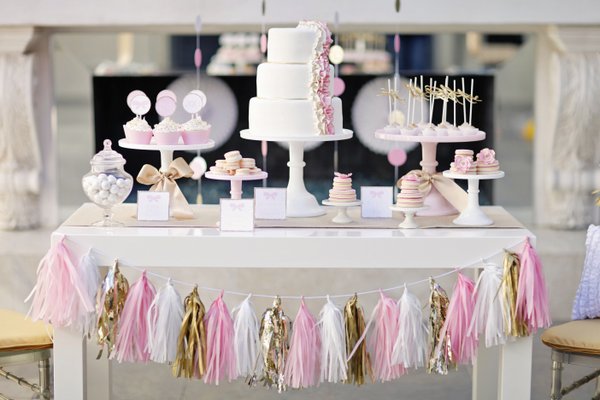
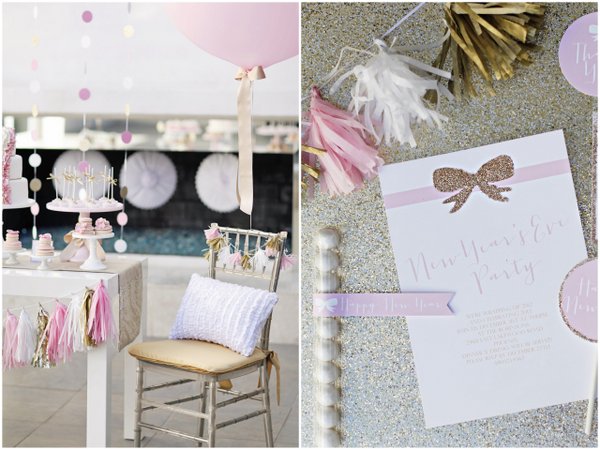
One of my goals for the blog this year is to share more step-by-step tutorials. In case you missed it, this tissue paper tassel garland was featured in our pink + gold New Year’s Eve Party for HGTV. These tassel garlands inspired by Confetti Systems are turning up everywhere on the party scene and this was our first time making them. Molly, our crafty design editor took on the task and did a beautiful job! Not only did she make the full size garland, but mini tassel garland that we used on the chairs.
She taught me how to make them and seriously, it is so easy and so inexpensive. I know you’re going to be making them for your next party!
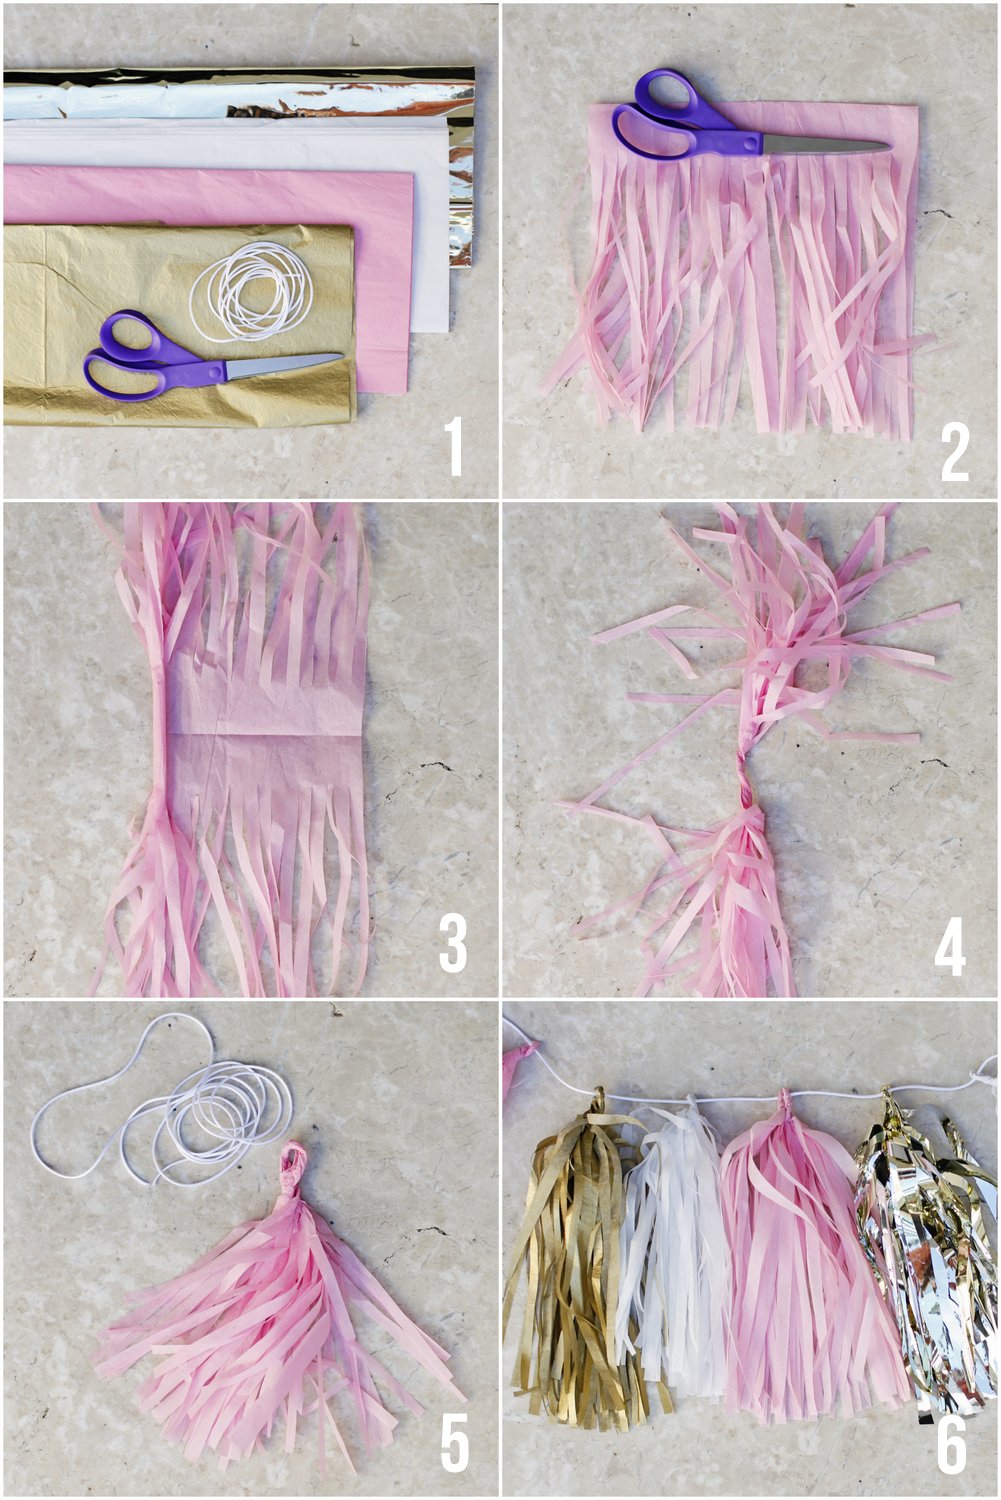
:: materials ::
- 1/2 sheet of tissue paper/mylar per tassel
- scissors
- ribbon/cord
:: instructions ::
Step 1: Gather materials.
Step 2: Fold a piece of tissue paper (20″ x 20″ or 20″ x 24″) in half and in half the other way. Cut strips towards the fold to create fringe, leaving about 1 inch uncut at the fold line. Once all strips are cut, unfold the tissue and cut in half so you have 2 sheets with fringe (to make 2 tassels).
Step 3: Unfold tissue paper.
Step 4: Begin rolling tightly down the middle crease.
Step 5: Continue rolling, fold in half and then twist to create a loop for hanging.
Step 6: Repeat to create additional tassels in various colors. Hang from thin cord or ribbon.
For more details and photos, view the full feature on HGTV here!
styling/tutorial :: the tomkat studio
photography :: ten22 studio
January 10, 2013
Post Date:
Leave a Reply
SUBSCRIBE
Don't miss a thing! Subscribe to our email list to keep up with our latest projects, listings, blog posts and giveaways!


Love the step by step tutorials….I have always wanted to make these and now I can from your fabulous instructions. Love this!
Thanks, Tina! I hope to share many more tutorials this year!!
Thanks so much for this tutorial! Will help me a lot with future projects!
Glad you like it, Wendy!
Yay! Thanks for the tutorial! I have a party coming up and these will be perfect 🙂
Fabulous!
In case anyone didn’t see the instruction on HGTV on how to make the smaller version opf the garland for say a chair, here it is: “For a version small enough to add flair to your dining chairs, use 1/8 sheet of tissue paper per tassel.”
Thanks, Tina! I should have included that in the post! The mini ones are adorable, too…aren’t they?
I’ll be hosting a bridal shower for my BFF in the late spring and this will be a PERFECT addition to the decor. I think your how-to was the best one I’ve seen yet. The girls at Pretty Providence shared something very similar last week but I love the way you formed the tassels (and they seem a bit more sturdy). Thanks so much for sharing. As always, you never cease to amaze me 🙂
Perfect! Let us know how they turn out!
Thanks so much for this great idea. And it’s so simple too! Love how pretty the tassles look.
Thank you so much, Linda!
Oh so happy I found this easy tutorial, my girls b-days are next month ! Thank you , thank you, thank you!:) Have a great weekend!!!
Perfect, Erika! Have a fabulous party!
Thank you so much for sharing! My daughter is having an American Girl birthday party in a few weeks and I’ve been looking for some fresh, new decorating ideas. This is perfect!
That would be adorable! The tassels are versatile, they really work for any type of event!
Thank you so much for sharing this tutorial. I’m hosting a lady’s tea party birthday next weekend and these would be cute in the decor (it could also work with fabric). Thanks!
The tassels would be adorable made from fabric, too! Great idea! Let me know how it turns out!
Kim..THANK YOU! I am planning my daughters 2nd birthday party and I always look to you for inspiration. I will for sure be including these into her celebration. Thanks again.
thank you for showing me how to make these i will certainaly be busy for the on coming parties xxx
Beautiful!! Thanks for the tutorial. I’m sharing your post on my blog.
I don’t know why I’m so confused on what to do for making the loop? I twisted mine, but what do you do then? Fastening it with tape looked awful, I could always wrap another piece of tissue over the tape but then again, using more tape. I’m sure I’m just over thinking this.
is anyone able to help a girl out?? 🙂
LOVE these… making them now for my daughter’s birthday party! A quick tip I found that helps… Once you have folded the tissue paper and before you start cutting the strips… I am clipping the top part of the paper to a clip board. It holds the tissue paper in place and helps make nice, even strips!
Love this tutorial so much we used the idea in one of our baby shower parties! Check out how cute this Bicycle-themed baby shower turned out featuring your tissue paper garland: http://bit.ly/peartree-bicycle-shower Thanks again for sharing!
That looks fantastic! May I share on FB? PS. What is your first name?
Thanks, Kim! Yes, definitely you can share on your Facebook page 🙂 My first name is Dani, but Christy is the one who threw the baby shower party (her bio is at the bottom of the baby shower post if you’d like to know more about her:)). Thank you! -Dani
THANK YOU. I’ve been searching for that missing step to understand it properly and you have it listed as Step 4. Easy to follow so I pinned this right away. I’m up late working on my second child but first daughter’s first birthday party, and this tutorial made it so much easier than the one I’d been using.
Beautiful photography, too!
Hi Kim! Love this tutorial! I couldn’t believe how easy these were to make!
I made a tulle version on my blog and linked it back to your blog
Since its the best tutorial! You can see it at:
http://randrworkshop.blogspot.com/2013/03/tulle-tassel-garland_13.html
Thanks again!
Rachel (R&R Workshop)
Such Beautiful garlands ! I’m looking for that golden metallic sort of paper but can’t find it anywhere? Do you have any ideas where I can look for papers like that? I would prefer websites as I live in Sweden..
Regards
Elin
Lovely! I’m working on one in a champagne gold, blush, white and navy! But I can’t seem to get them spaced out. As soon as I hang them on the string, they all bunch together instead of hanging like yours! What did you do to get yours to not all fall to the center of the string?!
Hi Kim,
Where do you get the gold mylar for these? How do you keep them from all falling towards the center? Thanks!
Hi Katie! We found gold mylar at Hobby Lobby. Also, we used a touch of hot glue to hold them in place on the cording. 🙂
Thanks for your great tutorial! I used it to make tassels for large vintage balloons at my gender reveal party!
https://hellobrielle.wordpress.com/2013/07/29/ombre-gender-reveal-party/
So cute! Thank you for sharing! CONGRATS…it’s a girl!
I love this. I cant wait to use this for my LASH Bash Party!
Hi! Wrapping up a NYC trip and would love to use your tissue paper garland DIY. I hope it is ok to link to you and use the DIY photo. Thanks! With credit, of course.
where can I find that shiny tissue paper? having trouble thanks 🙂
It’s mentioned above: Hobby Lobby; it’s gold Mylar
Hope this helps!
Thanks so much for this awesome tutorial! I just made one of these for a bridal shower I just hosted. It’s pretty much the easiest/cheapest/cutest decor idea for parties ever! Here’s a pic of mine up on my blog: http://www.mygirlishwhims.com/2014/04/navy-yellow-gray-diy-wedding-shower.html
I’m going to try this and make some curtains for my granddaughters room. She is really into Paris décor and the bling.
Thanks for the tutorial! This was so easy, we made a few for a balloon wall for an upcoming event! Love this site.
Having a kid-puppy ‘combo’ birthday party in less than two weeks, and scrambling for decorating ideas. This came up on Pinterest and Google – thanks SO MUCH!! These tassels will be everywhere!